
Steven Fechino
A framing square is typically considered a carpenter’s tool, but we will not worry about that right now. I was looking at the square the other day, and I thought about my dad; he was a carpenter, he knew how to read and use the square for things I never imagined, so I thought a few of us could benefit from the teachings of an old carpenter. A framing square is typically considered a carpenter’s tool. Still, we will not worry about that right now. Masons use them all the time, maybe it is just to lay out a right angle, but we use them.
The square has names for the simple parts, not the long end and the short end. The 16-inch end (shorter of the two ends) is called the tongue (commonly used to calculate run), and the 24- inch end is called the blade (used to calculate the rise) for the long end. The square is considered face up when the tongue is on the right side.
The corner on the outside is called the heel. The square is used for the layout of most carpentry framing, but in the masonry trade, we can use it to construct temporary steps from a tool trailer or even a set of steps we will brick on a project where all of the grades are field determined.
The square has many numbers found engraved or printed on the Blade and the tongue commonly used for layout. On the face-down side of the framing square, many of the squares newer than 20 years will have five different scales, 1/16-inch. It would take a long time to discuss the different scales and charts. However, the main numbers useful to a mason are as follows.
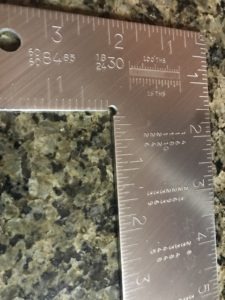
1/8-inch, ¼-inch (some of these are the same scale, and some are found on their own), 1/10-inch (used for engineering drawings), and 1/12-inch (used to convert to feet and inches when calculating board or hypotenuse lengths).
Though the 1/12-inch scale is uncommon, it is useful when you determine the hypotenuse and, when paired with another second framing square, will give you the length in feet and inches of the board or hypotenuse required for your project.
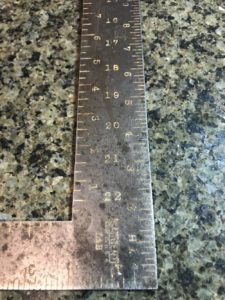
The body of the framing square can have several different scales that are useful to masons depending on who made the scale and how old the framing square is. They can be board foot calculators (something we would not use), stud spacings (useful when attaching to hidden metal stud framing when placing anchors in advance of a veneer), multiplication tables in feet and inches.
Pilot hole and anchor charts, fractions to decimals (good when working on structural drawings), multiplication tables that convert the multiplication table to feet and inches, and rafter stringer (for masonry, it would be the tip of the tread) lengths. The framing square has many uses, but let’s see how it can simply help us in our daily tasks.
Every once in a while, you need to figure something out in the field, not in the trailer. The different scales on the framing square can reference measurements from the drawings. I am not saying to scale a drawing. I am saying it is a reference. The square can be used to check your corner layout, pier layout, and many other angles, not necessarily 90 degrees.
For a masonry application, let’s say we are stocking off a school project, and we need to set a set of steps to extend up 18 courses of Concrete Masonry Units (CMU) so approximately 12 feet. To make this simple, we will assume the top step at 12.00. Here are a few standards for steps: The riser (rise) is generally by 7-inches, and the tread (run) is anywhere from 9 to 12 inches.
I recommend that the rise be what works out best, starting at 7 inches when you go to calculate the stairs, but never will I recommend a tread of the step to be smaller than 11.5 inches (width of a 2-inch by 12-inch tread material) because boots will be worn when using the steps and mud boots will be worn when the site is messy due to weather. Boots are big and need the extra tread depth.
Let’s do a quick layout for the steps. The goal is to connect to the 12.00. floor(rise). We do not restrict how far out the steps can extend from the building (run).
Ok, the layout is fairly simple and will be much quicker than trying to figure it out by field trial and error. I will detail how to figure the design of the stringers out.
- Start by assuming the rise (height) of each step is 7-inches. 7-inches /12-inches per foot is .58-foot.
- 12-foot height (total rise) /.58-foot/riser= 20.68 risers. This will not work because of the fraction, so we need to adjust. Adjusting with a step riser increase will typically reduce the number of steps and make construction faster once calculated.
- Adjust to 7 ½ -inch riser (7.5-inch/12 inch /foot=.625-foot. 12-foot (total rise) / .625-foot/riser= 19.2 risers or 19 risers, we can work with this on an unfinished jobsite
- We will use 11.5-inch treads, but the run will be 11-inches to have a ½ inch overhang on each step. The overhang of the step is not part of the run calculation. We now need to find out how far the base of the steps will be from the top step horizontally. 19 risers X .92-feet (11-inches / 12 -inches / foot= .92=feet (run/step) = 17.48-feet. This means the tip of the bottom of the steps will be 17 1/2 -feet away from the back of the wall.
- To this point, we have 19 steps with 11-inch treads that will extend 17.5 -feet from the wall and a height of 12-feet.
- Now we can calculate the length of the stringer. You can take the framing square, flip it over to the backside. Using a second framing square, all you will need is the height of the steps (12 feet) and the total run (17.5 feet). Take a second square (also on the backside) and place the top of the tongue on the 12-inch mark, and on the blade, place the top of the square on the 17 1/2 -inch mark. Now read the top square measurement. This will be in feet and inches using the 1/12th-inch scale. The measurement will be 21-feet-3-inches
- This can be checked using the Pythagorean Theorem (12) X (12) + (17.5) X (17.5) = 450.25 Square Feet. The square root of 450.25 square feet is 21.22 -feet; this would equal 21-feet 3-inches.
- When laying out the cuts on the stringer, all you need to do is take the Framing Square on the topside, using the inside of the square (heel down), attach stair gauges (little clamps that fit on the square) on the tongue at 7.5-inches and 11-inches on the heel. Place the square on the stringer and mark out the triangle cuts that will rise and run for the steps. You will need to start on the right of the stringer and use the top of the board (side furthest away from you). The bottom of the stringer will be on your right side.
- Once you have all of your cuts marked, you will need to plumb and level the stringer to connect to the top of the steps and flat on the ground or floor surface. This is completed by making a perpendicular cut to the bottom tread and a perpendicular cut to the top riser.
There will be two stringers, three if you build a 30 inch or wider set of steps. The material for the leg support adjacent to the building (12-foot length) and the treads must be added when figuring materials. The top step is often eliminated when you are connecting to a finished floor platform. The stringers for this example should be 24-foot material.
ProTip, The framing square in Las Vegas, left out in the open during the summer months, will burn the heck out of our bare hands…just sayin’, not like I would do something so, ok, I did.
Using the square may seem confusing, and some parts are until you build with it one time. Without detailed explanation, the entire steps of figuring the stringers should take only about 2 or 3 minutes; once you are familiar with the scales on the framing square, the calculator is only used to calculate the number of risers and total run.
Good luck. I hope this helps.