Moisture Management
The Three-Part Rule for Moisture Management
The three-part rule of moisture management is to “get moisture off of, out of and away from a construction detail as quickly as possible.” However, we are left with the nagging questions: Off to where? Out to where? Away to where?
Answering these three questions is the really difficult part of the rule. Only a fraction of the liquid water involved will evaporate into thin air and, in some cases, even then it still can have a negative impact on the construction detail.
Part I: Off a construction detail
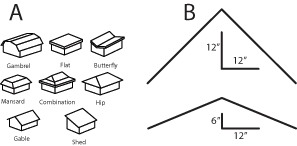 Let’s start with getting the water “off of” a construction detail. Obviously, this applies to hundreds and hundreds of details; however, let’s start with roofs. Roofs can be sloped to drain in many directions. (See Image A.)
The roof style depends on numerous factors, including architectural style, distance to be covered, budget, etc. Generally, for moisture management purposes, the more slope, the better. The greater the slope (pitch) on a roof, the faster liquid water can run off. (See Image B.)
This is important, since the less time liquid water is on a construction detail (roof), the less likelihood it will absorb into that construction detail.
We also should reduce the number of projections or obstructions that are in the path of this draining liquid water. Anything that slows the flow of liquid water off a construction detail, such as chimneys or vent stacks, increases the amount of time that liquid water will spend on the construction detail. (See Image C.)
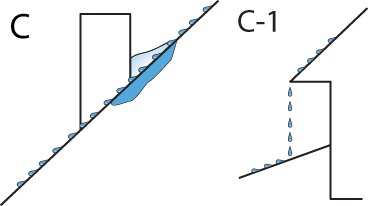
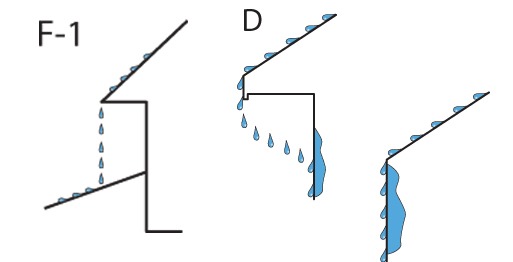
Once the water reaches the roof perimeter, where does it go? (See Image C-1.) A good rule to follow is to not allow it to come back into contact with the building or any other construction detail. (See Image D.) There should be a relationship between the depth of the overhang (eve) and the height of the wall from eve to grade. (See Image E.)
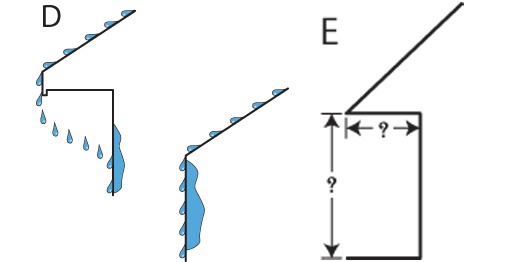
This ratio is valid only up to a certain height. Multi-storied buildings have other concerns with moisture on their exterior building envelopes that deal with the variation of surface pressures on the exterior building envelopes of high-rise buildings. This eve detail is the most straightforward of all perimeter roof details. (See Image F.)
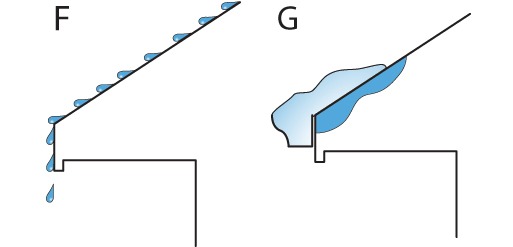
Perimeter roof details that involve a gutter and downspout add many concerns. They complicate the detail and must be designed, installed and maintained correctly. Gutters and downspouts can easily trap debris, ice and snow, and these obstructions slow down and even dam up liquid water. (See Image G.) These debris and ice dams have caused building owners and insurance companies hundreds of millions of dollars through the years.
The best scenario for liquid water, once it is off a roof perimeter detail and headed downward, is directly to a designed grade. (See Image F-1.) If it comes in contact with the surface of the building’s exterior wall or lands on another construction detail, more work is to be done. (See Image D.)
Concerning construction details include other lower roofs and roof pitches, tops of doors, tops of windows, tops of walls, etc. The roof runoff water from a higher roof adds a whole new dimension to the moisture management equation, since it can be a concentrated flow. When it lands on a lower surface, it can, over time, erode the lower construction detail. The roof runoff water from a higher roof delivered in a slow “drip, drip” fashion, creates a perpetually wet condition for the lower construction detail. This perpetually wet state is extremely undesirable from a moisture management standpoint. (See Images H & I.)
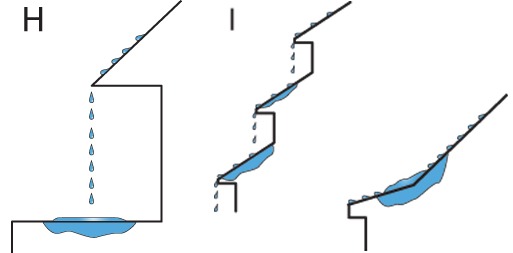
Though the amount of water may be small, the unchecked, constant delivery allows all the water to be absorbed into the construction detail. If liquid water flows from roof to roof to roof, moisture management becomes extremely difficult, if not impossible. (See Image I.)
Part II: Out of a construction detail
The amount of water entering a construction detail is certainly of concern. However, the amount of “time” that even a small amount of water is in a construction detail also is of concern. The extended time factor will allow moisture to absorb more deeply into the detail. Amount and time are negatives, because they extend the drying cycle – possibly even into the next wetting cycle – allowing the construction detail to be in a perpetually wet condition.
This extended wet condition also may be subjected to a freeze-thaw cycling, compounding the problem. The amount of time that moisture is in contact with a construction detail is, in many cases, even more critical than the amount of moisture involved. It also can result in the much-publicized mold issue.
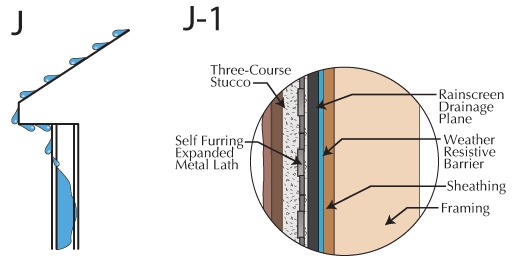
Mold is, in many ways, like corn or soybeans: It needs a consistent, steady moisture supply. A construction detail that is persistently wet and has a growth supporting material (organic) in it or on it probably will grow a healthy crop of mold that is hazardous to the health of the building’s occupants. Designing a construction detail that allows the moisture entering it to have a designed way to exit it is probably a good idea. (See Images J & J-1.) In fact, getting moisture “out of” a construction detail is the law! (2009 IBC R703.12.1.)
Part III: Away from a construction detail
Once the liquid water is on the top surface of the surrounding grade, the third element of moisture management comes into play. We need to get the moisture that we have drained “off of” and “out of” the building, “away from” any and all construction details. Building sites must have a designed drainage plan. This drainage plan should be in place from the earliest stages of the planning phase; it should be rigorously maintained during the construction phase; and it should be continued throughout the building’s useful existence.
Unfortunately, this is one of the most neglected aspects of good moisture management. If neglected, dire consequences may occur, since critical structural components of a building such as basement walls and footings, and their supporting soils, may be compromised. (See Image K.)
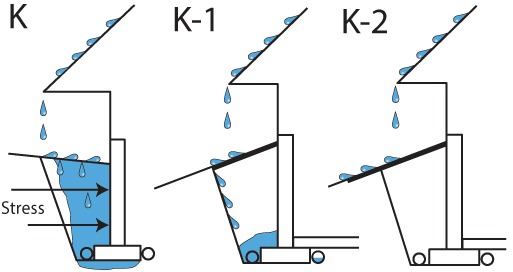
The drainage plan begins with properly poured footings and correctly constructed and waterproofed foundation walls. A drain tile system also should be included. Once these items are in place, continual monitoring and maintenance is critical. Backfill and foundation support soils that are subjected to constant moisture will put unwanted stress on below-grade construction details. In areas where expansive soils exist, or where deep frost can occur, this variation in moisture content can be disastrous. (See Image K.)
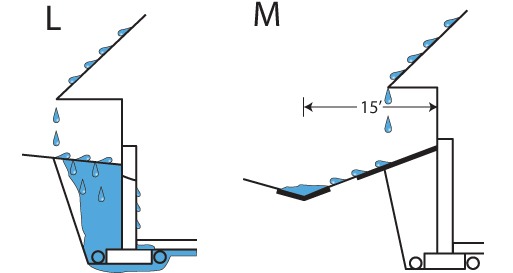
Landscaping, both hard and soft, that is immediately adjacent to buildings must be designed to compensate for fill disturbed by foundation excavation. (See Images K-1 & K-2.) If this runoff water needs to be diverted around dwellings, the pathway swale needs to be a minimum of 15 feet away from dwelling and, preferably, hard surfaced. (See Image M.) Excessive moisture will also over-stress the moisture-resistant coatings and drain tile systems that should be a part of below-grade construction details. (See Image L.)
The high moisture content of these soils also will intensify thermo-transfer characteristics of the backfill and support soils. Water and/or high-moisture-content materials transmit temperature better than air and dry or low-moisture-content materials. Soil temperatures 42 inches below grade are consistently 52 and 54 degrees F. When they are nearly saturated with water, they may not be cooler, but they will be able to transmit the 52 and 54 degrees F temperature to the below-grade construction details more efficiently.
If the ambient temperature in the below-grade construction details cannot keep basement walls and floors warmed, and if they are constantly in a cool condition, chances are that surface temperatures of these foundation components may be at or below the dew point, and condensation will occur. When water vapor condenses on a surface, or on other air particles, liquid water droplets form. This can and often does create a “wet basement.”
By now, it should be apparent that, by not complying with the “away from” part of the rule of good moisture management, really bad things can and will happen. Designing and maintaining a good drainage plan for a construction site is not easy, but it is well worth it. A construction site with a designed and maintained drainage plan is more efficient for everyone involved. A site that is allowed to turn into a “swamp” will regularly impact the site, including the soils and the fill surrounding the building foundation, and that may have both short-term and long-term negative consequences.
Conclusion
When it comes to managing moisture, it should be obvious that there are direct connections among all moisture management conditions and components. John Donne wrote, “No man is an island, entire of itself.”
The same thing holds true for any construction component or detail. Very few, if any, features or factors of a construction project stand alone. A holistic relationship exists, and the improper treatment or neglect of any one component will imperil the rest.
Case Study |
|
Manganaro Midatlantic provides water-tight exterior for new headquarters building. With a fleet of ships that includes 35 different types of cutters and smaller boats, the U.S. Coast Guard understands the importance of keeping its vessels watertight. A well-built ship or boat enables servicemen and servicewomen to carry out their search-and-rescue operations, patrol missions, and other duties as safely as possible. Manganaro Midatlantic, a subcontracting firm specialized in quality masonry, drywall and acoustical ceiling work since 1958, believes that the service’s administrative employees, both military and civilian, should enjoy that same assurance regarding their working space. During the construction of the new Coast Guard Headquarters on the historic St. Elizabeth Hospital site in Washington, D.C., the company worked painstakingly to ensure that the vapor barrier and masonry it installed would form a tight, attractive, waterproof shell for the building.
The Coast Guard Headquarters includes an 11-story, 1.2 million-square-foot building, an adjacent parking structure, and a central utility processing building. Its construction is the first phase of a multi-year plan that will consolidate most of the operations of the U.S. Department of Homeland Security onto one campus. Manganaro Midatlantic performed all of the masonry work on the Coast Guard building, installing 85,000 square feet of bricks, concrete masonry units (CMU), interior block work partitions, and garages. It also was responsible for the application of the air and vapor barrier. The project was challenging on several levels, according to Jonathan Lane, Manganaro Midatlantic’s senior project manager. “The blast protection requirements and the configurations of elements such as the windows made the coordination between trades exceptionally difficult,” Lane says. “Many trades, including ours, had to go to the wall two or three times to sequence the work in the proper order, so that we could ensure we were giving the owner a blast-resistant and watertight product.” To form the building walls, for example, Manganaro’s crews had to fully grout the CMU and then place dowel rebar in every cell. “There’s a massive amount of effort that went into getting the blast-proof skeleton up so that we could put the veneer on,” Lane says.
Before the company could apply the spray-on air and vapor barrier to these walls, it had to carefully prepare the base using blue skin membranes that seal the building in transition areas. These areas include windows, corners and places where the underlying material changed from concrete to gypsum or from concrete to CMU. “Applying the blue skin on this building was probably the most concentrated amount of detail work that we’ve ever had to do,” says Lane. For the transitions between the window system and the skin, Manganaro Midatlantic coordinated materials with the window contractor to make sure that the products selected by the architect would hold up over time. “There were instances where certain products couldn’t touch each other; you had to be very conscious of that during the installation,” Lane continues. Lane also assisted the Clark Construction design/build team in coordinating the use of its scaffolding among all trades, including its own air and vapor barrier and masonry groups. “This is one example of how Manganaro Midatlantic’s One Voice One Team approach benefits the project owner and the project schedule,” Lane says. “We are able to ensure that we had the air and vapor barrier completed in one area before having the masonry crew move there.” Another advantage of the One Voice One Team approach is evident in the cooperation among various crews. Although Manganaro’s groups generally are dedicated to one particular trade – masonry, for instance – employees are willing and able to pitch in as needed to help out other facets of the company’s operations. “The different groups also provide quality control checks for each other’s work,” Lane says. “The air and vapor barrier guys would check the substrate to make sure that it looked right as a quality control measure. Then, before we put the bricks and flashing on, we would make sure that the air and vapor barrier was installed correctly.” Manganaro Midatlantic has spent two years on the project and has completed it substantially. The construction of the entire Coast Guard Headquarters was completed in Q1 2013, with employees moving into the watertight – and shipshape – building this summer. For more information, contact Lindsey Beedle at lbeedle@christiecomm.com or 805-969-3744, or visit www.manganaro.com/midatlantic. |
