Sponsored By:
![]()
Words: Isa Stein and Jake Boyer
Photos: PROSOCO
Hardscapes is a growing type of masonry market. While many people might know these as pavers, it is important to know what kind of paver, such as clay, concrete or natural stone. If they are concrete, are they wet cast or dry cast? If they are natural stone, what type of stone are they? Siliceous stone like sandstone or granite, or calcareous stone like limestone, marble or travertine? There are various important steps to take in order to clean your hardscapes properly, and MASONRY Magazine talked with Jake Boyer from PROSOCO to address them.
Step 1: Identify Your Substrate
If you are unsure of your substrate, first test to see if it is acid-sensitive. To do this, Jake Boyer suggests taking “just a drop of an acidic cleaning product, preferably one that contains hydrochloric acid such as one of PROSOCO’s new construction cleaners. Then, apply a single drop of it on the substrate in a discreet spot.” If it reacts with the substrate, you will see it bubble or fizz, which Boyer says “tells you that it contains some sort of acid-sensitive materials.” If you have clay pavers or a siliceous natural stone, you will see that nothing will happen when you drop the acid on it.
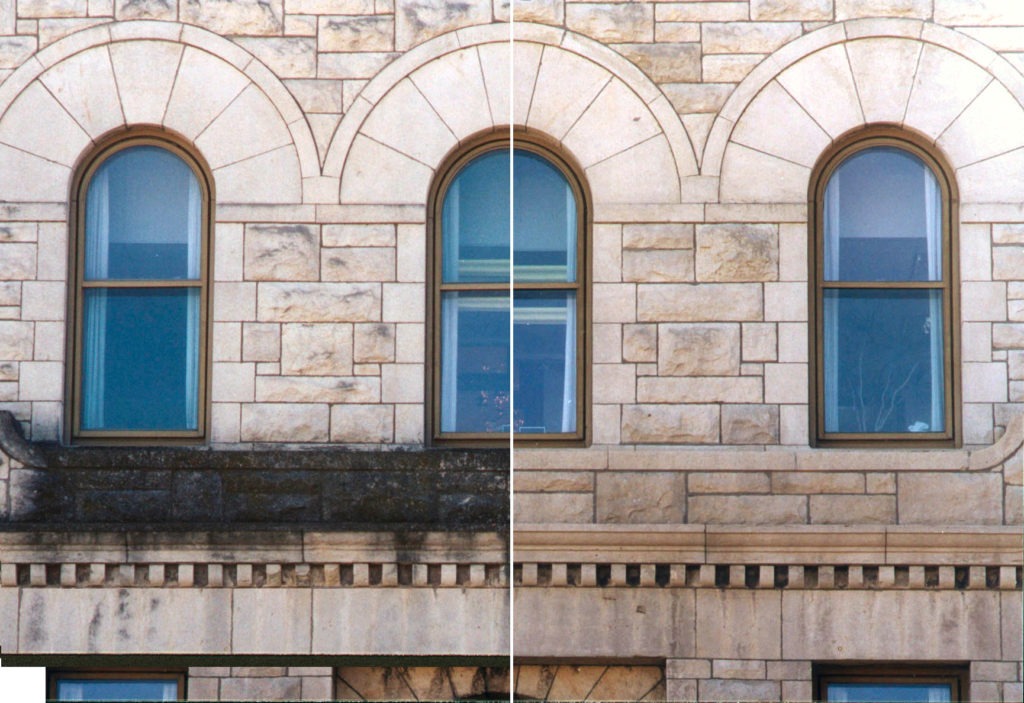
On clay pavers, biological staining tends to be concentrated around the mortar or sand joints. This is due to the fact that clay pavers do not contain lime. Lime is a great food source for biological staining, which can not only look bad but actually dissolves and digests the free lime within the substrate as its food source, degrading it over time.
Step 2: Identify The Staining Conditions
Identify what staining conditions you’re trying to remove. The most common stain in hardscapes is biological or organic staining. “Oftentimes, algae, mold, moss, lichen, mildew, and other organic stains can take many different shapes and colors,” said Jake Boyer.
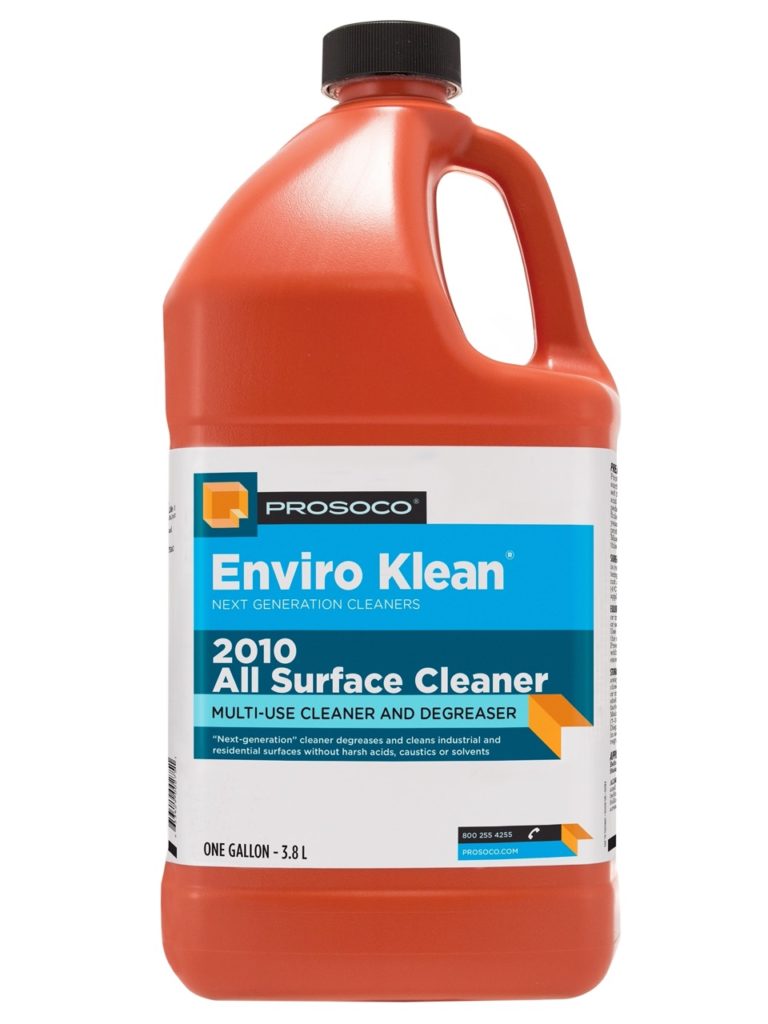
For light moss, mildew, and mold, Jake recommends starting with PROSOCO’s 2010 All Surface Cleaner. This product is great for moderate soiling and general spring cleaning. 2010 All Surface Cleaner is a non-acidic surfactant base cleaner and can be spiked with bleach if needed. If you’ve got light to moderate biological staining, you might step it up to ReVive, which is a single-component biological remover. For moderate to severe staining, then you should probably step it up to a product called ReKlaim Cleaner, which is a cleaner plus activator that requires a neutralizing after wash. It’s the more aggressive of those three, and “… the reason I mentioned them in that sequence is we always want to start with the mildest and work our way towards more aggressive products as necessary.” If you start with something stronger or do not test the substrate, it is harder to backtrack.
Step 3: Cleaning
To remove biological stains, it is important to allow the solution to absorb into the staining itself. That way, the product will reach the roots and prevent quick regrowth of the biological stain. Many people believe the misconception that pressure washing is enough, but as Jake explains, this method “…is like cutting the grass. You’re cutting the tops off that you can see at the surface, but you’re leaving that root structure intact… it’s going to grow back in a short time. So it’s very important to remove it with a product that’s designed to physically, completely remove that staining, as opposed to just removing the visible layer.”
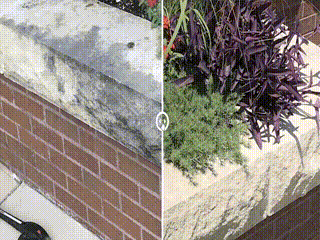
Other stains, such as efflorescence, don’t require the product to get into the substrate but rather remove it from the visible surface. Efflorescence can come from the natural salts within the substrate itself or other salts from deicing or salt water and air in coastal areas. Since it is not living, it won’t be able to grow back. Oftentimes, true efflorescence can be removed with water alone since efflorescence is water-soluble, although assistance from an appropriate cleaner can simplify and accelerate the removal and help ensure it doesn’t come right back when it dries. A common mistake is assuming anything white on the surface is efflorescence. Other common issues, such as lime run or lime staining, may be similar in appearance to efflorescence but require a different approach to removal since lime run is not water-soluble once it has reacted with the carbon dioxide in the atmosphere. Lime-related stains require an acidic cleaner to remove the alkaline staining.

Although efflorescence can be removed by water, Jake Boyer suggests that you might still want to use a product to assist in fully dissolving the stains. First, you must thoroughly prewet the surface so the substrate does not absorb the cleaning compound since you only want to clean the visible surface. “That’s where a product like Light Duty Concrete Cleaner would be our first choice. For hardscape applications, it’s going to be good for some general dirt and soiling and gets all your winter grime that gets on there. It also has a mild acidic component to it, which will help remove early deposits of efflorescence, lime run, surface rust and more. A lot of times, people have cast iron furniture that sits on the patio all winter, and then they move it and then you get the little rust footprints, so it’ll help take some of that stuff off as well.”
“The easiest way to determine if you have efflorescence or some other form of white staining like lime run is to splash some water on the surface. If the stain disappears when wet, you’re likely dealing with efflorescence. (It will likely come back when the surface dries without the assistance of a cleaning product to fully dissolve and flush from the substrate.) If the staining is unaffected by the water splash, then you’re likely dealing with lime, hard water, or other staining conditions that must be addressed accordingly.”
If your hardscapes have apparent lime staining, you would want to use something more acidic such as Vana Trol, Custom Masonry Cleaner, or 600. Many people do not want to use an acidic cleaner, but with stains like lime run, there is no other way to ensure its removal due to the pH balancing that the acidic cleaner brings.
At the most basic level, there are only two ways to remove anything. You can dissolve the staining element itself, or you can dissolve the interface between the staining and the substrate at a microscopic level. The pH scale is a good example of dissolving the stain itself. It’s this simple: If you have an alkaline stain, you need an acidic component to dissolve it. According to the laws of chemistry, there is no such thing as a non-acidic product that will remove alkaline stains like mortar smears, lime run or others.
“Lime is an alkaline material. If you have lime run, you can use an acidic product that will dissolve that alkaline stain. If you have a more resilient stain, like a deeply embedded rust stain, you might need to break down the interface between the stain and the substrate. I’m attacking the actual portion of the substrate that’s bonded to that stain, and we’re washing them away together. So the key is to control how much of that you’re washing away so you don’t change the physical appearance of the substrate, which is why we always start with the mildest and work our way up to make sure that we’re only removing as much as we actually need to.”
Step 4: Protective Treatments
“Most stains require water to form and present themselves on the surface. Once your stains have been thoroughly removed, it is best to allow the substrate to thoroughly dry, then apply a penetrating protective treatment to make sure that future water doesn’t get in there and reestablish or mobilize those stains,” suggests Boyer. A key benefit of protective treatments is that they are going to repel the water and the stains it carries and/or mobilizes, keeping the substrate cleaner for a longer period of time.
When choosing a protective treatment, it is important to look for a breathable penetrating treatment. These treatments work by absorbing into the pore structure of the substrate so the material is not deposited on the surface, where it can create a continuous film that traps moisture. By lining the larger areas of the pore structure and chemically reacting with the substrate to form a resilient bond, these products will prevent bulk, liquid water from getting in but still allow the smaller water vapor molecules to permeate out of the substrate and dry.
A common mistake is applying a film-forming “sealer” to the substrate. If you were to put one of these non-breathable, film-forming sealers on, it’s equivalent to “…wrapping it in saran wrap,” Boyer says, meaning that once the moisture gets in, there is no path to escape. “The water within the substrate that’s trapped under a non-breathable sealer will expand under freeze-thaw conditions and can create spalling, mobilize other stains like lime and efflorescence, and it can make the sealer blush or turn white on the surface.” “With most penetrating protective treatments, you’re able to get a minimum of five years, if not ten-plus years of performance. Most acrylics or other film-forming sealers will only give you one to five years of performance before they need to be reapplied. These types of sealers also tend to wear down in high-traffic areas, leaving you an uneven appearance.”
In Summary
Using the proper cleaners and protective treatments will ensure longevity and resiliency in the face of weather changes and natural wear and tear. PROSOCO offers many products available to assist in this process as well as resources for proper techniques. Please visit prosoco.com or email customercare@prosoco.com with any questions regarding your spring cleaning.