Lipped brick details are common when replacing brick shelf or relieving angles and at many loose-laid lintel replacements. The lipped brick has a section of the brick removed on the bed section of the brick, typically, ½ to ¾ inch by 2-7/8 inch on a standard modular brick. The section that is removed historically has been placed as the bottom of the brick with the remaining portion of the lipped brick facing down. This method of placement can create concerns for the owner, installer, and project management team as it adds unnecessary installation issues that can easily be solved with less cost to the project.
The problems are simple, the lipped brick reduces the bed joint of the brick being laid because the bearing is only 2-7/8 inch instead of the full 3-5/8 inch bearing that a full modular brick would offer. Second, with a drip edge involved, a special-order drip edge must be figured and ordered, which can take time and often be forgotten by the project manager. Third, the lateral shear strength of the wall will be reduced at the lipped brick drip edge joint. Fourth and most important, labor will be slower messing with all of the little details involved in a successful installation of the custom drip edge.
Mortar Net Solution is providing a lipped brick detail that improves efficiency and wall performance with less cost to the contractor. In detail number one, we show a typical lipped brick detail where we flip the lipped brick over to where the top of the lip is even with the top of the shelf angle or loose laid lintel. We understand that this needs to be laid out ahead of time to make a bond, but as the reader of this text, you know you can make up the difference within about four-bed joints for a shelf angle or about seven joints for a window lintel. The drip edge that is now to be used is a standard off the shelf drip edge that is not special order and easily obtained. The bricklayer now can install the brick in a full bed of mortar not slowing his production and not reducing the lateral sheer strength of the wall.
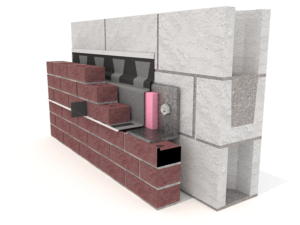
Detail number one is also a method that can be used for the lipped brick detail. However, this is concentrated more on the shelf angle replacement project. Depending on the anchor bolts that are detailed for mounting the shelf angle, they can stick out farther than the depth of the cavity and they can sometimes just be in the way. We know of several contractors that have had to cut the flashing and seal around the nut and bolt connection, something we do not recommend. What we do recommend is to use rigid insulation or marine plywood behind the TotalFlash as a way to smooth out the protrusion of the anchor. The rigid insulation or plywood can have holes bored into the material to allow space for the anchor.
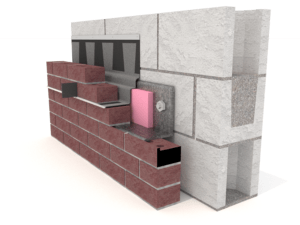
Detail number two, placing the drip edge one course above the brick ledge is allowable when weeps are placed under the drip edge as well as above the drip edge. This method of raising the flashing course eliminated all the clutter that needs to be worked around to properly and effectively flash the relief angle.