Adding Drainage to Stone Veneers and Adhered Masonry
Words: Dan KamysDecember 2014
Adhered Masonry
By Steven Fechino
When installing adhered veneer, mix the different mortars to the proper consistency to improve adhesion and minimize color variances.
Cultured stone has been around for a long time, and many of us have become quite proficient in installing the “lick-and-stick” products as part of an adhered veneer wall. These veneered walls consist of a weather-resistant barrier, drainage plane, lath, weep screed, scratch coat and veneer material.
Adhered veneer walls are not to be confused with Exterior Insulation Finishing Systems (EIFS). EIFS is comprised of a non-load-bearing exterior wall system that includes an insulation board attached to the substrate either adhesively, mechanically or both; a reinforced base coat; and a textured protective finish coat. EIFS is not typically recognized by the masonry trade and is usually installed by a contractor who specializes in both EIFS and stucco installations.
Several improvements for installing veneers have been made possible through the work of the Masonry Veneer Manufacturer’s Association (MVMA) and the National Concrete Masonry Association (NCMA). Newly improved veneer mortars have changed recently in a positive way. Typically, conventional mortars with post-packaging admixtures created the opportunity for mixing errors, but now SPEC MIX and Sakrete are offering Stone Veneer Mortars that are polymer modified and that will improve adhesion for vertical applications without the need for any additional admixtures. Though the products from the two companies offer only subtle differences, it is important to choose the correct product for your individual application.
| |

|
| |
Shown is an image of combined wire lath and drainage mesh all in one |
When installing an adhered wall, it is important to select or install your specified weather resistant barrier (WRB). WRB’s can be designed as one of the following types of barriers: two layers of building felt, designated building wrap materials, and liquid applied or roll membrane barriers that can function either as air or air and vapor barriers. The various WRBs feature a wide range in performance and expense to the project, so estimate carefully and always consider the wall penetrations when estimating the wall and window wrap products.
Currently available drainage materials create a gap between the wire lath and the weather-resistant barrier. ClarkDietrich has developed a certified Grade D asphalt paper backing for ceramic tile, ornamental and fire-proofing applications. This type of lath allows for air movement, so the wall will remain drier. For applications of adhered masonry where cultured stone, natural cut stone or thin brick veneer are to be used, Mortar Net Solutions has developed LathNet. LathNet has a ¼-inch polyester drainage mesh adhered directly to the metal lath that simplifies the installation and reduces the wall penetrations. This product is installed in a shingling method as you install the product up from the bottom of the wall. With the combination of a weather-resistant barrier and the drainage mesh, the moisture that finds its way through the base and scratch coat will follow the path through the mesh directly to the weep screed.
Wire lath has several common configurations. The standard expanded steel galvanized base material can include the standard diamond pattern with flat, self-furring dimples or a V-groove. The dimple and the V-groove have a ¼-inch projection that is installed toward the substrate to create a gap that allows the wire lath to become completely encapsulated when the scratch coat is applied. The self-furring V-groove wire lath follows the same principle as the dimpled. However, the V-groove runs horizontally with a sheet in the length of the 27 inches high X 96 inches long.
The MVMA, in conjunction with the NCMA, says that wire lath is to be installed “cups up,” with the lath having a smooth feel as you run your hand down it. Fasteners for the wire lath are typically installed every 16 inches horizontally and seven inches vertically, with anchors not installed between the studs in the sheathing. Interior and exterior corners should always extend past the seam of the corner by at least 12 inches, and wire lath overlap is permissible as long as it does not affect the final plane of the wall.
 |
|
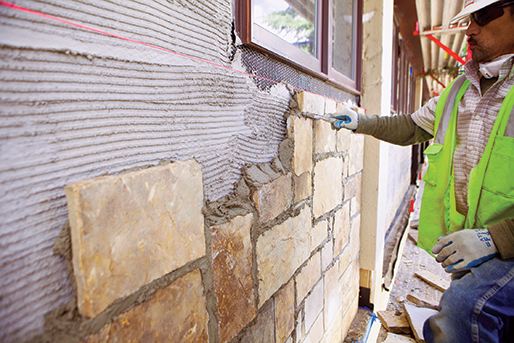
| Shown is mortar installation |
|
Weep screeds are simply the starter strip at the base of the wall that allows any moisture that accumulates behind the veneer to weep at the base of the wall. Typically made of light-gauge metal, the weep screed also aids in supporting the veneer as it is installed and during the curing time.
When installing the adhered veneer, it is important to mix the different mortars to the proper consistency, which will improve adhesion and minimize color variances. When the scratch coat is applied, it should cure for about 12 hours before the veneer is installed. When the actual veneer is installed, there are several methods for setting the individual stones, but the most common method is to butter the back of each stone, allowing a small void in the middle of the stone for the mortar to bond evenly once compressed to the substrate. Placing with a gentle twist as the stone is applied will allow it to bond. If setting mortar happens to find its way to the face of the veneer, simply wipe the wet mortar off the stone with a wet cloth to minimize the surface damage.
When filling in the joints between the individual pieces of stone or thin brick, the use of a grout bag makes the application much easier and neater than the conventional tuck-pointing method. Once the mortar is squeezed from the bag, allow it to sit for several minutes before you tool the mortar for a good bond. A tip I learned when using a grout bag is that it helps to have two bags. Keeping one bag in a bucket of water while you use the other bag, then switching bags each time you refill with mortar this will keep the bag’s bladder wet and allow for the mortar to discharge easier each time you refill the bag.
The lick-and-stick veneers should be installed as cleanly, to reduce post-installation washing. Cleaning some of the adhered veneers can affect the appearance of the veneer for the life of the building. Pressure washing is not recommended for adhered veneers after construction or even as a maintenance effort during the life of the building, because it can remove the surface color and texture from some veneers.
Steven Fechino is engineering and construction manager for Mortar Net Solutions.
Return to Table of Contents