
Manufactured Stone
Masons, Start Your Engines
 Can manufactured stone compare to NASCAR? You bet. Like a new season of NASCAR, the leader board has shifted. Like Jimmie Johnson, manufactured stone is taking market share as the fastest growing product in the siding category. Manufactured stone is being used more on interior, rather than exterior, commercial and residential projects.
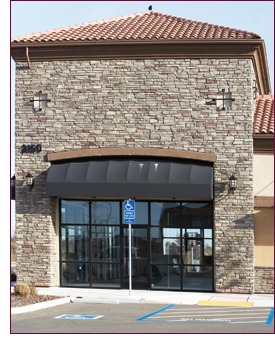
Manufactured stone has come a long way since its initial introduction. Back then, it was known as “lick and stick.” Today, it’s called Veneerstone. It’s like comparing a four banger to a V12. Manufactured stone mimics natural stone in color and texture. It can be extremely difficult to the untrained eye to differentiate, and one may even need a magnifying glass to tell the difference.
Due to the increase in popularity by the construction industry, the top manufacturers in the United States have come together to form the Masonry Veneer Manufacturers Association (MVMA). The association continues to demonstrate why manufactured stone (AC-51) is so popular with architects, home owners and contractors.
With today’s economy, the roads are slick and, yet, new construction has come to a 5 mph speed zone. Don’t fret, a new season is on the horizon, and the bleachers soon will be packed with new construction.
Since the economy is down, now is the time to diversify. If you don’t know already how to install manufactured stone, get into the pits and learn, or you will be lapped.
Installation is as easy. Visit the MVMA website, www.masonryveneer.org or www.veneerstone.biz, for the latest installation instructions.
From the seat in your cockpit, installation training webinars now are available. The MVMA is working with the American Institute of Building Design (AIBD) to offer its members the MVMA educational and technical resource training that can help them remain current, informed and competitive as they expertly specify and incorporate masonry veneer into their building designs. That same installation training is being made available to the mason. In addition, Veneerstone hosts manufactured stone installation clinics for contractors. Simply call 866-578-5616 to learn about events in your area. With a mason’s background, in little time, you can become an expert manufactured stone installer.
If car insurance is what you’re after and installation warranty is important to you, the producers of thin set offer multiyear installation warranties. The system has piqued the interest of the industry. Traditional masonry mortars remain the preferred method of installation; however, thin set is gaining ground.
Whether used to accent your fireplace or outside living area, manufactured stone can increase the value of your home. Stone is so esthetically pleasing, there is a perceived value. You will find manufactured stone in the winner’s circle, because of its pure beauty, versatility and ease of installation. It should be no surprise that it is building such a huge fan base.
Masons, now is the time to start your engines. Learning to install manufactured stone can rev up your business. Before you get started, and the checkered flag begins to wave, choose your team wisely. Assure that they are part of the Masonry Veneer Manufactures Association.
Preparing your wall over framing
Installing Veneerstone over framing (wood or metal) with sheathing (plywood, OSB, rigid insulation, gypsum wall board, concrete board, fiber board) is done as follows:
STEP 1:?? Ensure all penetrations are properly flashed in a watershed fashion.
STEP 2:?? Install two layers of Water Resistive Barrier, overlapping the horizontal joints 2-inch, shingle fashion. Vertical seams should overlap 6 inches. Double wrap Water Resistive Barrier at inside and outside corners a minimum of 16 inches, both sides.
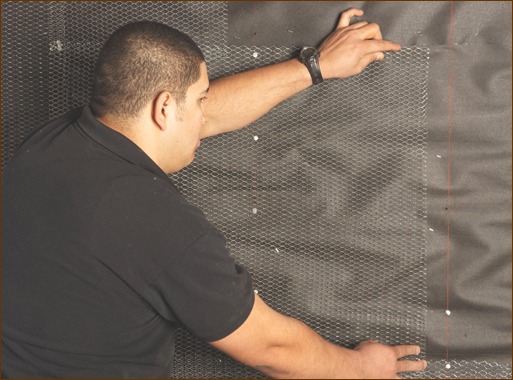
STEP 3:?? Following local building codes, install mesh or lath. Lath should be installed horizontally, overlapping sheets 1 inch at the edges. Fasteners should be spaced 6 inches on center vertically, and 16 inches on center horizontally and driven into the studs at least 1 inch. Wrap lath around corners to next framing member and lap lath at framing member.
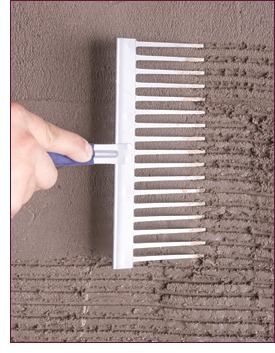 STEP 4:?? Trowel a 3/8-inch nominal thick coat of mortar to the metal lath to create a mortar scratch coat. Press hard enough to firmly embed the lath with mortar.
STEP 5:?? Score or scratch the surface horizontally when mortar is “thumbprint dry.”
Note: Do not use manufactured stone in direct contact with chemicals (de-icing minerals, salt, chlorine), submerged in water, or below grade.
Stone application, setting stones in mortar
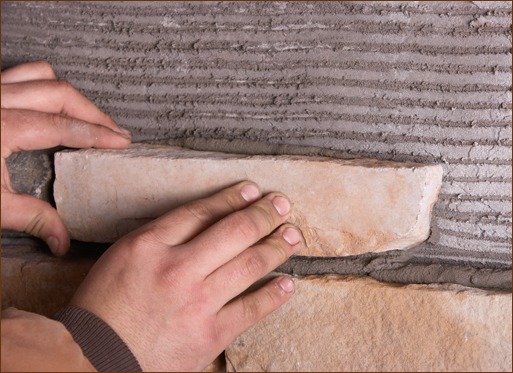
STEP 1: Completely cover the back of the stone with mortar, at least one-half inch thick, and press the stone firmly into the scratch coat to ensure a good bond. Press hard enough to squeeze out a little mortar around the edges of the stone. Assure you have complete coverage between the mortar bed and the surface of the stone.
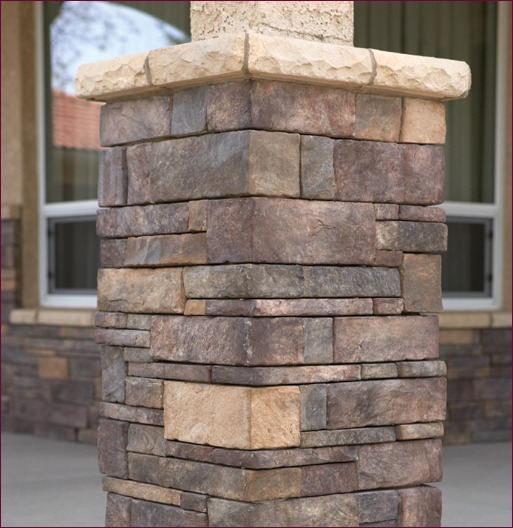
STEP 2: Corner pieces should be installed first. Alternate the long and short legs of the corner pieces in opposite directions.
STEP 3: After the corner pieces are installed, apply flat pieces, starting at the outside working toward the center of the wall.
STEP 4: Cutting and trimming – use the edge of a trowel, nippers or a circular saw with an abrasive blade to cut and shape stones. If necessary, broken stones can be trimmed and shaped to fill in any gaps. For the most attractive finished appearance, coat with mortar any cut or broken edges. Also, try to place cut edges up when they are above eye level and down when they are below eye level.
STEP 5: Grouting joints – in applications where a mortar joint is used, fill in the joints with a mortar bag, taking care to avoid getting mortar on the stones’ surface. Joints should be one-half inch to get the most natural look. Any accidental smears can be removed with a whisk broom after the mortar is crumbly. Never use a wet brush, wire brush, acid or acid-based product to clean the stone.
STEP 6: Finishing joints – proper jointing gives your project an appealing and professional finish. Before finishing, allow mortar joints to become firm (about 30 to 60 minutes), and then point them up with a jointing tool. Weather conditions and the type of surface can influence drying time.
STEP 7: Brush joints – remove excess mortar, and then firmly compress and seal the edges around the stones. Brush stones and joints with a dry whisk broom to finish and clean the project.
Mortarless (dry-stack) application
In dry-stack application in which no mortar joints are used, add a bonding agent to the mortar mix, and seal the finished project with a breathable (non-film-forming) sealer. Install from the bottom, up, and keep joints as level as possible.
Cleaning and sealing
Clean Veneerstone with a soft bristle brush and water. If stained with mineral deposits or efflorescence, stone may be cleaned with a diluted household vinegar solution (seven parts water,?? one part vinegar). Rinse thoroughly with clean water after cleaning. Do not use wire brushes or acid to clean Veneerstone. Seal Veneerstone in dry-stacked applications or in harsh environments with a breathable, non-film forming masonry sealer.
These notes are consistent with the MVMAs Installation Guidelines, which can be downloaded for your reference.
director of sales and marketing